


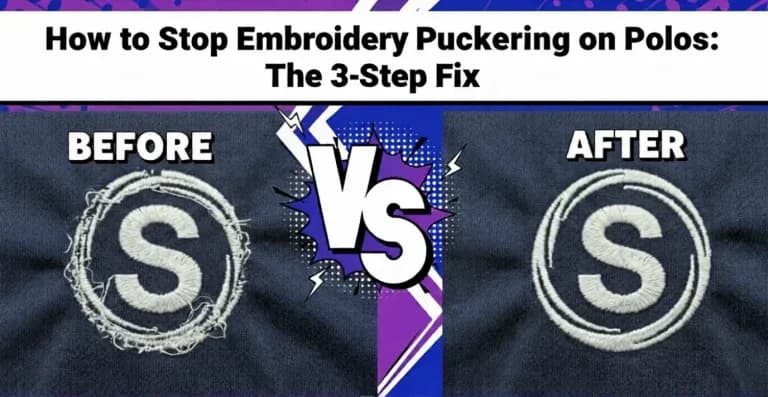
How to Stop Embroidery Puckering on Polos: The 3-Step Fix
There is nothing worse than finishing a run of 50 corporate polos only to realize the fabric is rippling around the logo. It is called puckering, and it creates a ring of waved fabric that makes the shirt look cheap. Clients notice immediately, and the garments often cannot be sold or delivered.
Most people blame the machine or the thread tension. But 90% of the time, puckering is caused by digitizing density and stabilizer choice. Here is exactly how the Quality Control team at Sassy Digitizing identifies and fixes this problem before it reaches the production floor.
⚡ Quick Answer
How do you stop embroidery from puckering on polo shirts?
- Switch from tearaway to medium-weight cutaway stabilizer for performance and stretch fabrics
- Open your stitch density from 0.40mm to 0.42mm or 0.45mm to reduce fabric compression
- Vary stitch angles so underlay and top stitching run in different directions to balance fabric stress
Why Does My Embroidery Look Like Bacon?
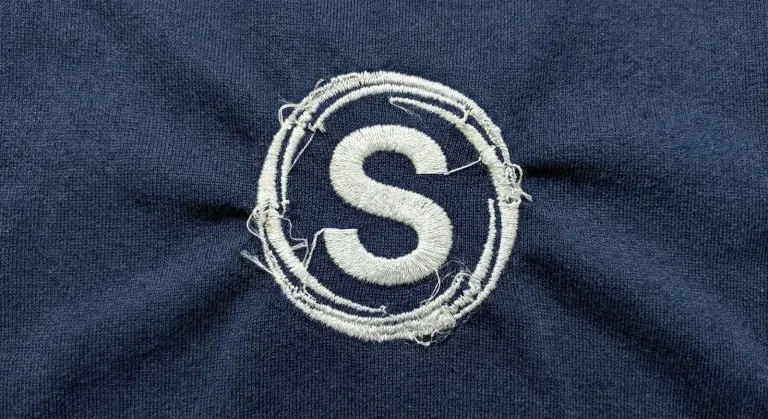
The rippled, wavy fabric around an embroidered logo is known in the industry as bacon puckering, named for the way the fabric waves and curls just like a strip of cooked bacon. It is one of the most common quality complaints in commercial embroidery production, and it appears almost exclusively on soft, stretchy, or lightweight fabrics.
Performance polo shirts, moisture-wicking fabrics, and lightweight knits are particularly vulnerable because they have very little structural rigidity to resist the compression forces of dense embroidery. When the file is not built to account for those forces, the fabric buckles and ripples around the design.
⚠️ 90% of puckering problems are caused by incorrect digitizing density and wrong stabilizer choice, not by the machine, the needle, or the thread tension. Adjusting machine settings will not fix a density problem in the file.
The Science: The Push and Pull Effect
Embroidery is aggressive on fabric. Every stitch punches a needle through soft material thousands of times and locks thread into place under tension. This creates two opposing forces working on the fabric simultaneously:
Pull Force
Each stitch pulls the fabric inward toward the center of the design. As stitch density increases, this inward pull becomes stronger. On stiff woven fabrics, the structure resists this force. On soft stretch fabrics, the fabric simply compresses and bunches.
Push Force
As the needle punches through, the fabric tries to escape outward from the needle point. This outward push creates the ripple ring visible around the outside edge of the embroidered area. The two forces together trap the fabric and create the bacon puckering effect.
If your digitizing file does not account for both of these forces through proper density settings, correct stabilizer choice, and balanced stitch angles, the fabric gets trapped between the two and deforms around the design.
| Force | Effect on Fabric | Solution in the File |
|---|---|---|
| Pull (inward) | Compresses fabric toward design center | Reduce density; add pull compensation |
| Push (outward) | Creates ripple ring around design edge | Add push compensation; use cutaway stabilizer |
| Directional stress | Pulls fabric in one direction like a drawstring | Vary stitch angles between underlay and top layer |
3 Ways to Fix Puckering Immediately
1 Switch to Cutaway Stabilizer
If you are using tearaway stabilizer on a stretchy polo shirt, you will get puckering. This is not a maybe; it is a certainty on performance fabrics. Tearaway is too weak to hold the stitches against the stretch forces of the fabric. It tears away during production, leaving the design with no structural support underneath.
| Stabilizer Type | Best For | Polo Shirts |
|---|---|---|
| Tearaway (light) | Stable woven fabrics only | ✗ Not suitable |
| Tearaway (medium) | Stable wovens with small designs | ✗ Not suitable |
| Cutaway (medium weight) | Performance wear, knits, piques | ✓ Recommended |
| Cutaway (heavy weight) | Heavy fleece, dense fill designs | ✓ For heavy designs |
| Water-soluble topping | Pique textures and Terry cloth | ✓ For textured pique |
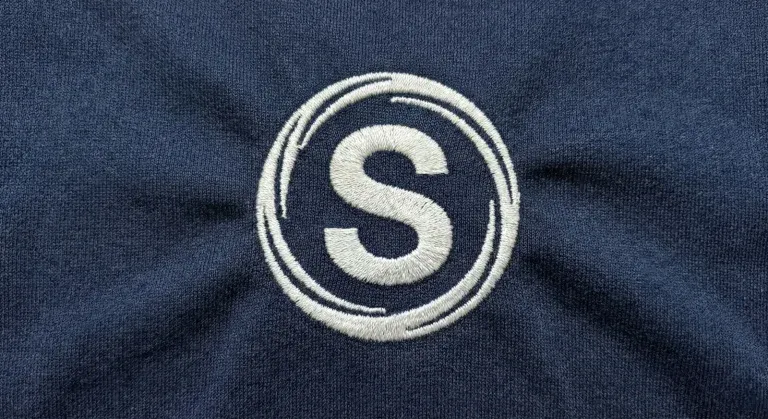
✅ The fix: Always use a medium-weight cutaway stabilizer for performance wear and any polo with stretch content. It acts as a permanent foundation for the stitches and does not break down during or after production.
2 Lower Your Stitch Density
Most auto-digitized files come with a default density of 0.40mm row spacing. This is appropriate for stable woven fabrics but far too tight for soft polo pique, performance knits, and lightweight fabrics. When density is too high, the thread packs in too tightly and physically compresses and pinches the fabric between the stitches.
Opening the density creates breathing room between stitch rows. The fabric has space to sit flat rather than being compressed from all sides by over-packed thread.
| Fabric Type | Recommended Density | Notes |
|---|---|---|
| Stable woven cotton | 0.38mm to 0.40mm | Standard density acceptable |
| Cotton pique polo | 0.42mm to 0.45mm | Open slightly to reduce compression |
| Performance / moisture-wicking polo | 0.45mm to 0.50mm | Lightweight fabric needs maximum breathing room |
| Fleece and heavy knit | 0.45mm to 0.55mm | Dense pile needs significantly reduced thread density |
| Cap front panel | 0.40mm to 0.42mm | Structured cap fabric; slight opening needed |
✅ The fix: Open the density to 0.42mm or 0.45mm for polo fabrics. This breathing room lets the fabric relax between stitch rows and eliminates the compression that causes puckering. Test on the actual fabric before the production run.
3 Fix the Stitch Direction
If all your stitches run in the same direction, for example all horizontal, they will pull the shirt in one direction like a drawstring. This creates a directional distortion that stretches the fabric along the stitch axis and leaves it permanently pulled to one side.
Professional digitizers vary stitch angles deliberately to distribute stress evenly across the fabric in multiple directions. When pull forces are balanced, they cancel each other out instead of accumulating in one direction.
| Stitch Layer | Recommended Angle | Why |
|---|---|---|
| Underlay stitches | 45 degrees | Diagonal underlay stabilizes fabric in both horizontal and vertical directions |
| Fill stitch top layer | 90 degrees (perpendicular to underlay) | Top stitching at 90 degrees to underlay balances directional stress |
| Adjacent fill elements | Alternating 45 and 135 degrees | Breaks up directional pull across multiple neighboring elements |
| Satin columns (text) | Perpendicular to the column axis | Satin stitches should cross the column width, not run along it |
✅ The fix: A professional digitizer varies stitch angles between the underlay and top stitching layers. Running the underlay at 45 degrees and the top stitching at 90 degrees balances the stress on the fabric and prevents directional puckering entirely.
Other Causes of Embroidery Puckering on Polo Shirts
The three fixes above solve the majority of puckering problems. However, there are additional contributing factors that experienced digitizers check when the three core fixes alone are not enough:
Incorrect or missing underlay stitches
Underlay stitches lay down the foundation that holds the fabric flat before top stitches are applied. Without proper underlay, the top layer has no stable base and the fabric shifts and bunches under the needle pressure. Center-run underlay for columns and edge-walk underlay for fill areas are minimum requirements on any polo shirt design.
Loose hooping
Fabric that is not drum-tight in the hoop moves during stitching and creates surface waves. Even with a perfect file, loose hooping produces puckering. The fabric must be taut and flat before the machine starts. Using a sticky adhesive backing on top of the stabilizer helps hold slippery performance fabrics without distorting them.
Incorrect pull compensation
Pull compensation adjusts the width of each stitch column to account for how much the needle pull will narrow it during stitching. Without adequate compensation, columns stitch narrower than designed and the tension differential between stitched and unstitched fabric areas creates puckering at the design edges.
Design too large for the fabric weight
A very large, high stitch-count design on a thin lightweight polo will always create some puckering regardless of density settings, simply because the total stitch volume is too heavy for the fabric to support. Large designs on lightweight fabrics require significant density reduction, additional stabilizer layers, and sometimes design simplification.
Thread tension set too high on the machine
While machine tension is rarely the primary cause, excessively tight upper thread tension increases the inward pull force during stitching. If density and stabilizer are already correctly set but light puckering persists, check that upper thread tension is set to the manufacturer's recommended baseline for the fabric type.
Puckering Troubleshooting Guide
| Symptom | Most Likely Cause | Fix |
|---|---|---|
| Ripple ring around entire design | Density too high; stabilizer too weak | Open density to 0.45mm; switch to medium cutaway |
| Fabric pulling in one direction | All stitches running in the same angle | Vary underlay and top stitch angles; use 45 and 90 degrees |
| Puckering only at design edges | Insufficient pull compensation; no edge underlay | Increase pull compensation; add edge-walk underlay |
| Design sunken into fabric pile | No underlay on pile fabric; missing topping | Add zigzag underlay; use water-soluble topping on textured pique |
| Puckering on performance fabric only, not on test fabric | Test fabric was more stable than production fabric | Always test on the exact production garment; retest after density change |
| Density and stabilizer correct but puckering persists | Loose hooping; fabric not drum-tight before stitching | Re-hoop tighter; use adhesive backing to hold slippery fabric |
| Puckering on large design, not on small logo | Total stitch volume too high for fabric weight | Reduce density further; add second stabilizer layer; simplify design |
Professional Tips for Pucker-Free Polo Embroidery
- Build a fabric-specific settings library. Keep a reference document listing your tested and proven density, underlay, and stabilizer settings for every fabric type you regularly embroider. Polo pique, performance poly, cotton fleece, and cap twill each need different base settings. Referencing this library eliminates guesswork and prevents repeat puckering problems across clients.
- Never test on different fabric than production. A density setting that produces a flat sew-out on a standard cotton test square may still pucker on a Nike Dri-FIT performance polo. Always run your test sew on the exact garment fabric before approving the file for the full production run.
- Reduce stitch count for very lightweight fabrics. On ultra-lightweight performance fabrics, consider simplifying the design to reduce total stitch count in addition to opening density. Fewer total stitches means less total compression force on the fabric, which is especially important for large designs over 8,000 stitches on thin material.
- Use topping on textured pique polo surfaces. Standard polo pique has a raised surface texture. Without water-soluble topping over the design area, stitches can sink into the pique texture and create an uneven surface that looks like puckering even when the fabric itself is flat. Topping holds stitches on the surface and produces a clean, raised design.
- Check the back of the garment, not just the front. Puckering caused by pull forces is often first visible on the back of the fabric as compressed, bunched fabric directly behind the design. If the back of the polo looks rippled or gathered even when the front looks acceptable, density and stabilizer adjustments are still needed.
Summary: The Pucker-Free Polo Embroidery Checklist
| ✅ | Stabilizer: Medium-weight cutaway for all polo and performance fabric types |
| ✅ | Density: Opened to 0.42mm to 0.45mm for polo pique; 0.45mm to 0.50mm for performance fabric |
| ✅ | Stitch direction: Underlay at 45 degrees; top stitching at 90 degrees; alternated between adjacent fill elements |
| ✅ | Underlay: Center-run under satin columns; edge-walk or zigzag under fill areas |
| ✅ | Hooping: Fabric drum-tight; use adhesive backing on slippery performance fabric |
| ✅ | Test sew: Always on the exact production garment before approving the file for the full run |
Frequently Asked Questions (FAQs)
Need a File That Does Not Pucker?
You should not have to guess which density works for each fabric type. At Sassy Digitizing, the Quality Control team manually adjusts stitch density, stabilizer specifications, underlay construction, and stitch angles for your specific fabric, whether it is a thick hoodie or a thin performance polo.
Every file leaves with settings matched to the production fabric and tested for efficiency and run-ability before it reaches the customer.
Get a Pucker-Free File for Your Next Order
Our Quality Control experts manually set density, underlay, and stitch angles for your specific fabric. No guesswork, no wasted garments, no post-production trimming.
Production-ready files delivered in 4 to 12 hours with free revisions included.
Keith Blair
Senior Quality Control (HOD)
As the Head of Quality Control at Sassy Digitizing, Keith brings over 12 years of hands-on commercial embroidery experience to the table. He is our resident problem-solver, specializing in the technical nuances of stitch density, pull compensation, and complex digitizing. When he's not establishing quality standards for 3D puff and appliqué, you'll find him perfecting the art of small lettering to ensure every stitch counts.
Expertise:
Related Articles

Knockdown Tackdown Stitch Embroidery: The Complete Guide
Knockdown tackdown stitch embroidery is the layer most digitizers skip and the one that matters most on fleece, terry cl…

Best Embroidery Digitizing Service 2026 | Sassy Digitizing
Scale your apparel brand or embroidery shop with the best embroidery digitizing service of 2026. Sassy Digitizing comple…

Best Embroidery Digitizing Settings for Hats and Caps
Stop ruining structured hats with flat sew files. Discover the essential digitizing secrets for curved 3D surfaces inclu…