


How to Remove Jump Stitches: Professional Digitizing Tips
Customers often notice loose threads or connecting stitches showing between parts of a logo and ask if the file can be edited so the jump stitches do not show. It is one of the most common questions embroidery shops receive, and in most cases the answer is yes: it can be fixed with proper digitizing edits.
Excessive jump stitches are almost always a sign of inefficient stitch sequencing in the digital file itself, not a machine problem. This guide explains exactly what jump stitches are, why they appear, and how a professional digitizer removes them so your sew-out comes out clean every time.
⚡ Quick Answer
How do you remove jump stitches in embroidery?
- Open the embroidery file in professional digitizing software such as Wilcom or Hatch
- Reorder the stitch sequence so elements are stitched in a logical, connected path
- Add trim commands at the correct points so the machine cuts thread cleanly
- Shorten travel stitches and route thread paths within design elements where possible
- Run a test sew-out to confirm all visible jumps are eliminated before production
What Are Jump Stitches in Embroidery?
Jump stitches are the connecting threads that appear when an embroidery machine moves from one design area to another without trimming. The needle travels across the fabric while the machine is not stitching, leaving a loose thread on the surface that must either be trimmed manually or, if the file is well-built, cut automatically by a programmed trim command.
Some jumps are unavoidable in any design. A machine has to travel between color zones and separate elements, and some of those travel paths will cross over open fabric. The key distinction is between jumps that are hidden within the design and jumps that sit on top of finished stitching where they are clearly visible.
The rule: Visible jump stitches on a finished garment are almost always a file structure problem, not a machine problem. The machine does exactly what the file tells it to do.
Why Do Jump Stitches Show in a Design?
Visible jump stitches are typically caused by one or more of the following digitizing problems:
Poor stitch order
When stitch elements are not sequenced logically, the machine zigzags across the design repeatedly. Each unnecessary crossing creates a visible jump thread on the surface.
Lack of trim commands
Trim commands tell the machine to cut the thread between two elements. Without them, the machine simply drags thread from one element to the next, leaving it exposed on top of the fabric.
Inefficient pathing between elements
A digitizer can route travel stitches underneath other stitching so they are never visible on the surface. When this is not done, jump paths cross open areas of the garment where they are immediately obvious.
Auto-digitized files without cleanup
Auto-digitizing software assigns stitch order randomly without applying thread path logic. The result is almost always a file full of unnecessary jumps that require extensive manual editing to clean up.
⚠️ When a design is not optimized, the machine leaves long threads that must be trimmed manually after every sew-out, or worse, they remain visible on the finished product and must be sent back for rework.
Why Manual Trimming Is Not the Best Solution
Many embroiderers respond to visible jump stitches by trimming them by hand after each garment comes off the machine. This solves the immediate visual problem but does nothing to fix the underlying file issue and creates real production costs over time.
| Manual Trimming Approach | Properly Digitized File |
|---|---|
| Requires post-production labor on every garment | Machine trims automatically at programmed points |
| Slows down production throughput significantly | Sew-out completes ready for packaging immediately |
| Increases labor costs per unit | No additional per-unit labor required |
| Risk of missed threads on complex designs | Consistent clean finish on every run |
| Inconsistent finish quality across operators | Repeatable production-grade result every time |
| Risk of accidentally cutting top stitches | No manual intervention needed after sew-out |
💡 Professional perspective: A clean embroidery file should minimize visible jumps before the design ever reaches the machine. Fixing the file once is always more efficient than trimming every garment manually for the life of that file.
How Professional Digitizing Removes Visible Jump Stitches
A professional digitizer does not just add trim commands and call it done. Jump stitch removal is a systematic optimization of the entire file structure. Here is exactly how it is done:
1 Reordering Stitch Sequences Logically
The first and most impactful step is restructuring the stitch order. A well-sequenced design stitches elements in a continuous, logical path so the machine rarely needs to travel across open fabric. The needle moves from one completed element directly to the nearest adjacent element, minimizing jump distance at every transition.
For example, in a logo with multiple letters, a poorly sequenced file might stitch the first letter, jump to the last letter, then jump back to stitch letters in between. A properly sequenced file stitches from left to right in one smooth pass, with each letter connecting naturally to the next.
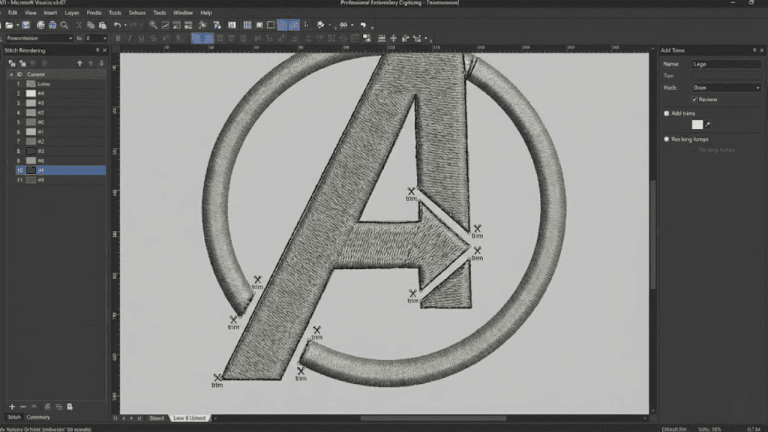
2 Adding Trim Commands at the Correct Points
Professional editing involves manually placing trim commands (shown as red X markers in software) at every point where the machine should cut the thread. When a trim is placed correctly, the machine cuts the thread flush with the fabric surface, leaving no visible jump.
The placement of trim commands is a judgment call that requires experience. Too few trims and jumps remain visible. Too many trims increase stitch time and create thread tails that must still be handled. Professional digitizers balance both concerns per design.
3 Shortening Travel Stitches
Where the machine must travel between elements, the digitizer minimizes the distance of that travel as much as possible. Short jumps beneath stitching are rarely visible on the finished product. Long jumps across open garment fabric always are. Reducing jump length is one of the fastest ways to improve sew-out appearance without restructuring the entire file.
4 Routing Stitches Within Design Elements
In many designs, the digitizer can route the thread path through the interior of a filled element rather than jumping across open fabric. For example, if the machine needs to travel from one side of a logo to the other, it can be routed through a filled background element so the travel stitches are completely hidden under the top layer.
✅ These four adjustments together keep thread paths hidden and create a clean, professional sew-out that requires no manual trimming after it comes off the machine.
Special Considerations for Small or Detailed Logos
Small designs and complex logos require extra care when removing jump stitches because the same techniques used on large designs do not always apply at small scale.
| Design Type | Challenge | Professional Approach |
|---|---|---|
| Small left chest logos | Long jumps are proportionally more noticeable at small sizes | Maximize routing within elements; trim every cross-space jump |
| Complex multi-element logos | Many elements create many potential jump points across the design | Group elements by proximity; stitch nearest elements consecutively |
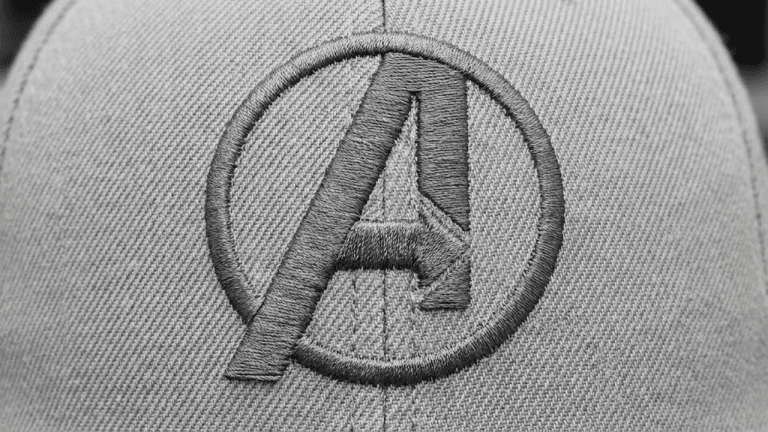
| Cap and hat designs | Tight spaces limit hidden travel path options | Use running stitch travel paths beneath satin columns |
| Designs with thin lettering | Letters too narrow to route travel paths through the interior | Place trims between each letter; sequence left to right consistently |
| Patch designs | Merrow border and fill elements both need clean transitions | Stitch border last; route internal jumps through fill areas |
💡 Key balance: Excess trim commands increase total stitch time because the machine must re-engage the thread after each cut. Professional editing balances a clean visual appearance with efficient production time. Every trim should be justified, not added as a default.
Common Mistakes That Cause Jump Stitch Problems
✗ Using auto-digitizing software without manual review
Auto-digitizing assigns stitch order based on the order shapes appear in the file, not based on spatial logic or proximity. The result is a file full of unnecessary cross-design jumps that require extensive manual cleanup to fix.
✗ Adding trims everywhere without optimizing sequence first
Some digitizers add a trim after every element as a shortcut. This produces a visually clean result but dramatically increases stitch time and thread consumption. The correct approach is to fix the sequence first, then add only necessary trims.
✗ Not testing the cleaned file on actual fabric
Software preview shows the stitch sequence path but does not simulate how thread behaves at machine speed. Always run a test sew-out after any jump stitch optimization to confirm the result is clean before sending the file to production.
✗ Adjusting jump stitch settings on the machine rather than fixing the file
Many machines have a jump stitch sensitivity setting that adjusts when the machine automatically trims. Changing this setting masks the problem for one machine only and does nothing for the underlying file. If the file is shared or run on a different machine, the jump stitch problem returns immediately.
✗ Ignoring jumps on the back of the fabric
Jump threads on the back of a garment can catch on clothing, stretch fabrics, or pull the design out of position over time. Even if the front looks clean, back-of-fabric jump threads should be minimized through proper sequencing and trim placement.
Troubleshooting Jump Stitch Problems
| Symptom | Most Likely Cause | Fix |
|---|---|---|
| Long thread loops visible on the front of the garment | No trim commands between elements; poor stitch sequence | Resequence by proximity; add trims at each cross-space transition |
| Machine trims but thread tails remain visible | Trim placed too early or too far from the start of the next element | Adjust trim position closer to the next element start point |
| Jump threads showing after switching thread colors | Color change sequence not properly trimmed before and after stop command | Add trim command at end of each color before the stop; add trim at start of next color |
| Design sews cleanly in preview but has jumps on fabric | Software preview shows paths but not actual thread behavior at machine speed | Always run a physical test sew-out; preview alone is not sufficient confirmation |
| Jump threads visible only on caps, not on flat garments | Cap frame rotation shifts design slightly; jump paths that were hidden become exposed | Re-test on a capped hoop specifically; adjust routing for cap geometry |
| Excessive stitch time after jump stitch cleanup | Too many trim commands added; each trim adds re-engagement time | Reduce trims by improving sequence; only trim where jumps would be visible |
Professional Tips for Jump-Free Embroidery Files
- Sequence by proximity, not by color. In many designs, you can stitch nearby elements of different colors consecutively by using the same thread and doing a color pass later. Sequencing by physical proximity on the design reduces jump distance more than color grouping does.
- Use running stitch travel paths inside fill areas. When the machine needs to travel from one part of a design to another through a fill area, embed a short running stitch path beneath the fill layer. The travel stitches are completely invisible under the top layer and eliminate the jump entirely.
- Always view the stitch simulation before exporting. Most professional digitizing software includes a slow-speed stitch simulation that shows the needle path element by element. Watch it before exporting and identify any jumps that cross open fabric. Fix them in the file before the machine ever sees it.
- Request the original source file, not just the PES or DST. If a client sends a file with visible jump stitch problems and asks for cleanup, always request the EMB or native digitizing file if possible. Editing a PES file directly is less precise than editing the native stitch object file where sequence and path data are fully accessible.
- Test specifically on the same fabric as production. Jump thread visibility varies by fabric color and texture. A jump that is invisible on white pique polo may be very obvious on navy fleece. Test on the actual production fabric before approving the file for the full run.
- Document your stitch sequence decisions. For designs that run repeatedly, keep a note of which sequence changes you made and why. When the file needs updating later, you will not have to re-analyze the jump stitch logic from scratch.
Summary: Jump Stitch Removal Checklist
| ✅ | Step 1: Open the file in professional digitizing software (Wilcom or Hatch) |
| ✅ | Step 2: Run the stitch simulation and identify every cross-space jump |
| ✅ | Step 3: Reorder the stitch sequence so elements are connected logically by proximity |
| ✅ | Step 4: Add trim commands at all remaining cross-space transitions |
| ✅ | Step 5: Route travel stitches within fill elements wherever possible |
| ✅ | Step 6: Re-export and run a test sew-out on matching production fabric |
| ✅ | Step 7: Confirm no visible jumps remain; approve for production |
Frequently Asked Questions (FAQs)
Final Thoughts
Visible jump stitches are not a machine problem. They are a file structure problem. With proper digitizing edits, including logical stitch sequencing, correctly placed trim commands, and smart thread path routing, jump stitches can be minimized or completely hidden, resulting in a cleaner and more professional embroidered product.
The fix is always in the file. If your current embroidery files are producing visible jumps on your finished garments, the right next step is a professional file review and cleanup by an experienced digitizer who understands stitch sequencing at a production level.
Need a File Cleaned Up?
If your embroidery file has visible jump stitches, Sassy Digitizing can optimize the stitch order, add trim commands, and eliminate messy thread paths. We specialize in clean, production-ready embroidery files built manually in Wilcom for every design.
File cleanup orders completed in 4 to 8 hours with free revisions included.
Keith Blair
Senior Quality Control (HOD)
As the Head of Quality Control at Sassy Digitizing, Keith brings over 12 years of hands-on commercial embroidery experience to the table. He is our resident problem-solver, specializing in the technical nuances of stitch density, pull compensation, and complex digitizing. When he's not establishing quality standards for 3D puff and appliqué, you'll find him perfecting the art of small lettering to ensure every stitch counts.
Expertise:
Related Articles

Knockdown Tackdown Stitch Embroidery: The Complete Guide
Knockdown tackdown stitch embroidery is the layer most digitizers skip and the one that matters most on fleece, terry cl…

Best Embroidery Digitizing Service 2026 | Sassy Digitizing
Scale your apparel brand or embroidery shop with the best embroidery digitizing service of 2026. Sassy Digitizing comple…

Best Embroidery Digitizing Settings for Hats and Caps
Stop ruining structured hats with flat sew files. Discover the essential digitizing secrets for curved 3D surfaces inclu…