


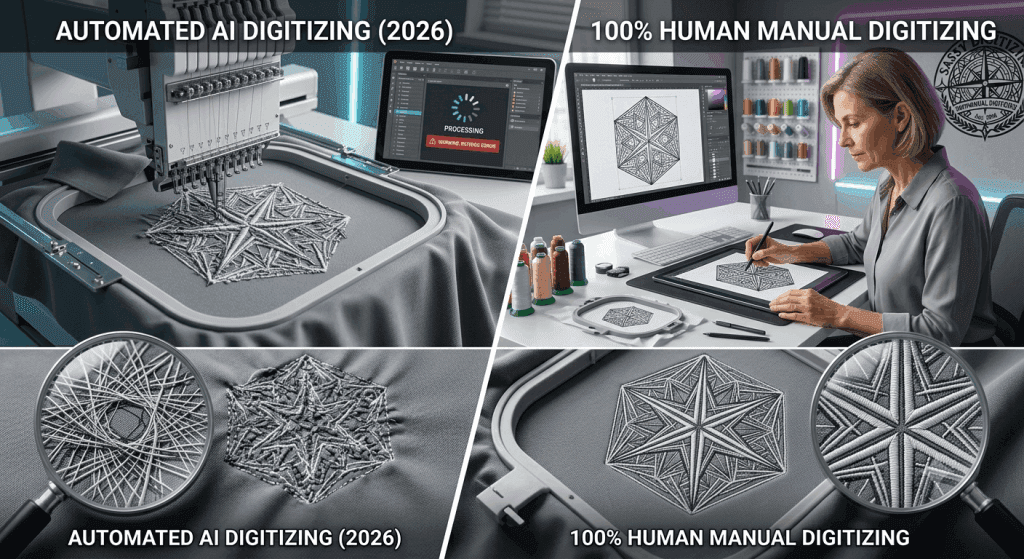
AI vs Manual Embroidery Digitizing: Why Automated Software Fails.
Every week, a new embroiderer falls into the same trap. They upload a beautiful client logo into an AI auto-digitizing tool. Within 30 seconds, they download a cheap PES or DST file. They load it onto their machine, press start, and watch the entire design fall apart on the very first stitch.
The stitches bunch up. The letters blur together. The fine details disappear into a messy blob of thread.
Most people blame their embroidery machine or their thread. But that is a mistake. The real problem is the automated AI software. In 2026, AI tools are faster and have flashier marketing, but their core programming cannot handle real fabric.
Manual digitizing by a skilled human is still the only way to get perfect retail results. This guide breaks down exactly why AI auto-digitizing fails, how manual mapping solves these problems, and how to choose the right method for your business.
What Is AI Embroidery Digitizing?
AI embroidery digitizing is a fully automated software process. You simply upload a flat image like a PNG, JPG, or SVG file. The software algorithm automatically converts that graphic into a stitch file (such as DST, PES, or JEF) without any human help.
Many online platforms and software modules like Ink/Stitch, Hatch, and Wilcom’s auto-digitize feature offer this quick solution. Some newer 2026 tools even use basic machine learning models to guess where stitches should go.
It sounds perfect because it is cheap and takes only seconds. For an incredibly basic shape or a single-color block letter, it might work okay. But the moment you upload a real logo, the automation hits a hard physical limit.
What Is Manual Embroidery Digitizing?
Manual digitizing is a hands-on craft. A professional digitizer opens your artwork inside premium software like Wilcom EmbroideryStudio or Hatch. Instead of clicking an “auto-convert” button, the human designer builds the entire stitch path by hand, object by object and color by color.
A professional digitizer makes critical decisions for every single shape:
Stitch Selection: Choosing satin, fill, or run stitches based on the exact size of the element.
Underlay Construction: Building a hidden foundation of stitches to stabilize the fabric.
Pull and Push Compensation: Modifying the digital shapes so they do not distort when the physical thread pulls on the garment.
Stitch Sequencing: Organizing the sewing order to minimize thread cuts and machine jumps.
Density Control: Adjusting stitch spacing based on the fabric lighter for stretchy knits and denser for stable woven materials.
7 Reasons Why AI Embroidery Digitizing Fails
AI tools look great in digital software previews, but they fail completely on real embroidery machines. Here are the seven main reasons why automated files ruin garments:
1. AI Cannot Understand Real Fabric
Embroidery is a physical process, not a flat print job. Every material from cotton polos and fleece to caps and leather reacts differently to a needle. AI software generates a single generic file. It does not know if you are sewing on a heavy canvas tote bag or a thin performance mesh shirt. Manual digitizers always adjust settings for your specific fabric before creating the file.
2. The Underlay Is Missing or Wrong
Underlay stitches are the hidden foundation of your design. They flatten the fabric nap and stop the top stitches from sinking into the weave. AI tools usually skip underlay or apply a random, weak setting globally. A professional digitizer sets the perfect underlay type (like zigzag or edge-run) for each separate object.
3. Pull Compensation Is Completely Ignored
When a machine sews, the thread physically pulls the fabric. This movement distorts your design. Circles become ovals, and sharp borders drift away from their fills. Manual digitizers purposely over-size shapes by fractions of a millimeter to counter this effect. AI programs cannot calculate this dynamic physical tension.
4. Fine Details Turn Into Blobs
Small text under 4mm, thin lines, and color gradients are impossible to sew without human adjustments. A manual digitizer intelligently simplifies these areas by thickening lines or changing stitch directions. AI software blindly tries to sew every single pixel, which causes heavy thread-breaking clusters and messy nests.
5. Messy and Inefficient Color Sequencing
The order in which your machine sews colors determines its efficiency. Bad sequencing creates endless thread trims, leaves ugly needle holes, and ruins the natural visual layering of the design. Manual digitizers route the needle path flawlessly from the background to the foreground. AI sequences colors strictly by math, creating messy jumps.
6. It Destroys 3D Cap Designs
Sewing a structured hat requires an entirely different setup than sewing a flat t-shirt. Because caps are curved and stiff, you must sew them from the center outward and from the bottom up. AI software only understands flat surfaces. If you run an AI file on a cap, the design will walk, warp, and misregister completely.
7. There Is Zero Quality Control
AI platforms hand you a raw, unchecked file generated by a machine algorithm. No human eyes ever review the stitch path. Conversely, professional studios check for errors, analyze density maps, and run physical test stitch-outs on real machines to ensure your file is production-ready before delivery.
Quick Comparison: AI vs. Manual Digitizing
| Feature | AI Auto-Digitizing | Manual Digitizing (Sassy Style) |
|---|---|---|
| Turnaround Time | Seconds to minutes | 2 to 4 hours |
| Fabric Adjustment | None (generic output) | Custom per fabric type |
| Pull Compensation | None or inaccurate | Set manually per shape |
| Fine Details | Drops or oversews them | Intelligently simplified |
| Cap / Hat Setup | Fails on 3D geometry | Digitized for cap curves |
| Quality Check | None | Senior human review |
| Best Used For | Simple shapes, low-stakes hobbies | Commercial & brand production |
When Can You Actually Use AI Digitizing?
AI auto-conversion is not completely useless, but it has a very narrow lane. It is only acceptable for:
Basic single-color geometric shapes with no fine detail.
Quick digital mockups and visual layout previews for clients.
Low-stakes, personal hobby projects where fabric puckering does not matter.
Never use AI tools for: Corporate uniforms, multi-color logos, hats, or any high-volume commercial production orders.
How Sassy Digitizing Builds Flawless Manual Files
At Sassy Digitizing, we never use shortcuts, auto-digitizers, or algorithms. Every single file is meticulously hand-mapped in Wilcom EmbroideryStudio by an expert.
Artwork Review: We check your logo for scale issues and minimum line widths before placing a single stitch.
Fabric Adaptation: We configure your file’s density and underlay based on the exact garment you plan to sew.
Manual Stitch Construction: We draw every element by hand to control pathing, pull compensation, and color sequence.
Senior Quality Check: A senior digitizer inspects the final stitch path and density map to avoid thread breaks.
Rapid Delivery: We deliver your perfect, production-ready file in under 4 hours with unlimited free revisions.
Frequently Asked Questions
Q: Can AI embroidery digitizing replace human digitizers in 2026?
A: No. The core challenge of embroidery is physical, not computational. AI cannot feel thread tension, fabric weight, or needle drag. Human expertise remains the industry gold standard.
Q: Why do my AI-digitized logos always pucker the fabric?
A: Because AI software does not apply fabric-specific push and pull compensation. It runs too many stitches in one direction without building a stable underlay foundation first.
Q: Is manual digitizing expensive?
A: While it costs more than a free AI app, manual digitizing saves you hundreds of dollars in ruined garments, broken needles, wasted thread, and lost machine production time.
Keith Blair
Senior Quality Control (HOD)
As the Head of Quality Control at Sassy Digitizing, Keith brings over 12 years of hands-on commercial embroidery experience to the table. He is our resident problem-solver, specializing in the technical nuances of stitch density, pull compensation, and complex digitizing. When he's not establishing quality standards for 3D puff and appliqué, you'll find him perfecting the art of small lettering to ensure every stitch counts.
Expertise:
Related Articles

Best Embroidery Digitizing Settings for Hats and Caps
Digitizing for hats and caps is a completely different ballgame compared to flat garments like T-shirts or hoodies. The …
How to Convert a Logo to Ricoma Embroidery Machine Format
Ricoma embroidery machines are industrial workhorses. Whether you own a single-head MT-1501 or a multi-head powerhouse, …
How to Convert PNG to DST for Embroidery: The Complete Guide
If you are new to the world of custom apparel, you might be wondering why you can’t simply open your company logo in Pho…