


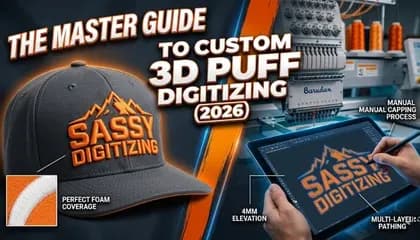
The Master Guide to Custom 3D Puff Digitizing (2026)
In the modern world of apparel decoration, standing out is the only way to survive. Customers in 2026 are no longer satisfied with simple, flat logos; they want texture, dimension, and a premium feel that justifies a higher price tag. This is where Custom 3D Puff Digitizing comes into play.
3D Puff, also known as foam embroidery, uses a specialized foam under the stitches to raise the design off the surface of the fabric. It creates a bold, architectural look commonly seen on high-end headwear, streetwear, and corporate branding. However, while the result looks amazing, the technical process behind it is a challenge for most amateur digitizers.
At Sassy Digitizing, we believe that understanding the "Why" and "How" of this craft separates a world-class shop from a hobbyist. In this detailed guide, we will break down every aspect of 3D puff digitizing, from initial artwork to final production.
1. The Science of Dimensional Embroidery
Before starting the machine, you must understand what happens during the stitch-out. In flat embroidery, the needle creates a 2D image directly on the fabric. In Custom 3D Puff Digitizing, the needle must travel through a layer of foam (usually 2mm to 6mm thick) before hitting the material.
The Displacement Factor: When the needle hits the foam, it displaces. If your digitizing file is too tight, the foam will expand out of the sides. If it is too loose, the thread will not cover the foam properly. This delicate balance is why manual digitizing is the only reliable solution for 3D projects.
2. Why Manual Digitizing Beats AI for 3D Puff?
Why manual digitizing still beats AI for perfect 3D puff results.
In 2026, the market is flood
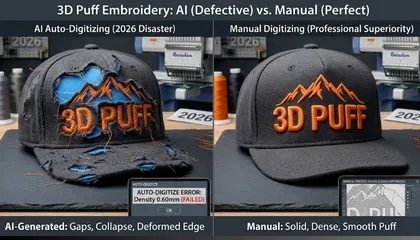
Why AI Fails at Puff:
Lack of Underlay Knowledge: AI does not know that 3D puff needs "Capping" stitches. Without these, the foam will stick out of the ends of your letters.
Incorrect Density: AI usually applies standard density. For puff, you need nearly double the density to ensure the foam is completely hidden.
No Pathing Logic: AI paths are often random. In puff embroidery, the path must be logical to keep the foam from shifting as the machine moves.
Manual digitizing ensures every single stitch is placed with the foam's thickness in mind. This expertise is why we are ranked among the Top 10 Best Embroidery Digitizing Companies in the World.
3. Preparing Artwork for 3D Puff
Not every logo is a candidate for foam. Understanding How to Prepare Artwork for Embroidery Digitizing specifically for 3D is a crucial skill.
Keep it Bold: Thin lines do not work. The needle will simply shred the foam if the column width is too narrow. As a rule, columns should be at least 3mm to 10mm wide.
Simplify the Geometry: Sharp, needle-like corners are difficult to execute. We recommend slightly rounding off the edges of your letters to allow the thread to wrap around the foam naturally.
4. The Technical Steps: Our Manual Process
When you send your file to Sassy Digitizing, it goes through a rigorous manual process:
The Base Layer (Underlay): We create a wide zig-zag underlay that "tacks down" the foam so it doesn't move during production.
Capping: We manually add "Caps"—small horizontal stitches at the ends of columns—to seal the foam inside. This is the hallmark of a professional service.
Corner Execution: We use "Mitered" or "Overlapping" corners to ensure the foam is compressed and covered, preventing the "poking through" effect.
5. Machine Settings and Production Tips
Even the best file will fail if the machine is not set up correctly. If you are struggling, here is How to Fix Slow Embroidery and production issues:
Needle Choice: Use a sharp needle (SES or Ballpoint) to cut through the foam cleanly.
Tension Settings: You must loosen your top tension. If it is too tight, the foam will be crushed, losing the 3D effect.
Machine Speed: Slow down! High speeds cause the needle to heat up, which can melt the foam.
Preventing Puckering: How to Fix Embroidery Puckering in 3D designs usually involves using a heavy-weight stabilizer to support the heavy stitch count.
6. Sassy Digitizing: Your Professional Partner
Why choose us? Because we don't just provide a file; we provide a production solution. We offer the Best Embroidery Digitizing Service 2026 by prioritizing your profitability. A file that breaks thread every 2 minutes is an expensive mistake.
Being a global leader means we stay updated with the latest machinery from Tajima, Barudan, and Brother. We know how to adjust a file for a 6-panel hat versus a flat hoodie.
7. Common Myths About 3D Puff
Myth 1: You can use regular craft foam. Fact: You need high-density embroidery foam for a clean "cut."
Myth 2: Any digitizer can do 3D puff. Fact: It is a specialized skill that AI and amateur tools cannot replicate.
Myth 3: You can't do small text in 3D. Fact: With a master's touch, small lettering can appear raised and readable.
8. Get Started Today
Ready to transform your business? Stop struggling with messy files.
2 to 6 Hour Turnaround: We work while you sleep.
Unlimited Revisions: We are not happy until you are.
Free Trial: Test our 3D Puff quality for free with your first logo!
Conclusion
Custom 3D Puff Digitizing is the ultimate way to show clients you are a professional. Don't settle for "okay" quality when you can have the Best Embroidery Digitizing Service 2026. Visit Sassy Digitizing today, and let’s create something extraordinary together!
Keith Blair
Senior Quality Control (HOD)
As the Head of Quality Control at Sassy Digitizing, Keith brings over 12 years of hands-on commercial embroidery experience to the table. He is our resident problem-solver, specializing in the technical nuances of stitch density, pull compensation, and complex digitizing. When he's not establishing quality standards for 3D puff and appliqué, you'll find him perfecting the art of small lettering to ensure every stitch counts.
Expertise:
Related Articles

Top 10 Best Embroidery Digitizing Companies in the World
In 2026, the embroidery industry has reached a level where precision is no longer optional iit's a requirement. Whether …

Best Embroidery Digitizing Settings for Hats and Caps
Digitizing for hats and caps is a completely different ballgame compared to flat garments like T-shirts or hoodies. The …
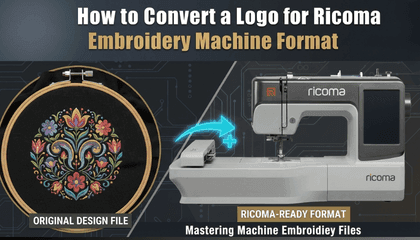
How to Convert a Logo to Ricoma Embroidery Machine Format
Ricoma embroidery machines are industrial workhorses. Whether you own a single-head MT-1501 or a multi-head powerhouse, …